
A boss Memory Fragment becomes active after that boss is defeated.
Official source ↗Content ArchiveQuests, bosses, challenges and completion records
CurrentPatch 2.00.02
Boss Intelligence Centre
Phase 25 research closure for all 17 canonical bosses, with 12 source-paired resolutions and 31 explicit remaining questions.
Patch 2.00.00 boss-data boundary
Section titled “Patch 2.00.00 boss-data boundary”Golden Star now has distinct phases and phase-specific attack patterns. Its identity remains indexed, but previous strategy detail is under Version 2.00.00 review until the new phase count, order, telegraphs and counters are observed.
The Enhanced update also adds unspecified boss-related Knowledge, items, Memory Fragments, dialogue and conversations. No new database identity is created without an official name or current-build evidence.
Boss fights and rematches
Find a boss strategy
Choose a boss to see verified mechanics, preparation, fight tactics, rewards and rematch guidance for Patch 2.00.02.
- Dossiers
- 17
- Verified rematches
- 5
- Official mechanic records
- 7
- Portrait coverage
- 4 / 17
- Operational briefs
- 17 / 17
- Research closure
- 12 resolved / 31 remaining
- Patch
- 2.00.02
What the official rematch system actually confirms
Documented rematches begin from the relevant Memory Fragment at the previous encounter site.
Official source ↗Reminisce preserves the original boss state; Resonate scales the boss when player progression is higher.
Official source ↗Consumables are restored after a rematch and separate rematch loot is not awarded under the documented system.
Official source ↗Known Memory Fragment locations can be reviewed through Journal > Knowledge > Memory Fragments > Bosses.
Official source ↗17 dossiers shown
Verified rematchPatch 1.07.00
Spoiler-hidden boss dossier
Complete the Eternal Corridor sequence to Clockwork Heart and defeat Clockwork White Horn; the mission record supports the complete four-part first-defeat package.
- Region
- Gate to Advancement
- Replay
- rematch
- Evidence
- community
- Story role
- story
Confirmed facts
Phase 25 resolved research
Clockwork Heart awards Hearty Mixed Harvest Bowl ×3, White Horn's Ring, Cogwheel ×250 and Small Battery ×200.
Evidence-backed operational brief
Community-verified operational recordPreparation
- Progress the Eternal Corridor sequence until Clockwork Heart is reachable.
- Create a safe save before the final encounter and keep this identity separate from White Horn.
- Verify the named objective and current patch before entering the point of no return.
Encounter route
- Complete the Eternal Corridor objectives leading into Clockwork Heart.
- Defeat Clockwork White Horn and confirm the bowl, ring, Cogwheel and Small Battery rewards are presented.
- After the first defeat, use the Gate to Advancement Memory Fragment for the documented rematch modes.
Safe recovery
- Reload the newest Eternal Corridor save if the final objective does not close.
- Verify all four documented reward lines before leaving the completed mission state.
- Preserve the newest working save and record the exact objective, patch and platform before escalating a repeatable fault.
Verified rewards
- Hearty Mixed Harvest Bowl ×3
- White Horn's Ring
- Cogwheel ×250
- Small Battery ×200
Official patch history
Still unresolved
- Exact hidden health, damage, resistance and Resonate scaling values remain unpublished.
Next controlled checks
- Capture a repeatable route from a named landmark to the first encounter.
- Record visible phase transitions and arena hazards without inferring hidden values.
- Capture the complete first-defeat reward presentation.
Verified rematchPatch 1.07.00
Spoiler-hidden boss dossier
During Chapter 12's A Shadow in the Void, reach Dimensional Bonds and defeat Corrupted Caliburn across three health-bar stages; the supported reward is Twisted Verdict.
- Region
- Fort Musket
- Replay
- rematch
- Evidence
- community
- Story role
- story
Confirmed facts
Phase 25 resolved research
Treat the fight as three health-bar stages. The second and third stages retain the same core attack set while clone pressure increases; health-bar transitions are the stable operational boundary.
Evidence-backed operational brief
Community-verified operational recordPreparation
- Reach Chapter 12 and progress A Shadow in the Void to Dimensional Bonds.
- Bring sustained healing and Spirit recovery, then create a safe save before the chamber.
- Verify the named objective and current patch before entering the point of no return.
Encounter route
- Follow A Shadow in the Void through the Abyss to Dimensional Bonds.
- Defeat Corrupted Caliburn across three health-bar stages; expect the core attack set to persist while clone pressure increases.
- Confirm Twisted Verdict is awarded.
- After the first defeat, use the Fort Musket Memory Fragment for the documented rematch modes.
Safe recovery
- Keep this identity separate from Awakened Caliburn when diagnosing a stalled chamber.
- Reload the newest safe save before the gate if the encounter or reward transition stalls.
- Preserve the newest working save and record the exact objective, patch and platform before escalating a repeatable fault.
Verified rewards
- Twisted Verdict
Official patch history
Still unresolved
- Exact hidden health, damage, resistance and Resonate scaling values remain unpublished.
Next controlled checks
- Capture a repeatable route from a named landmark to the first encounter.
- Record visible phase transitions and arena hazards without inferring hidden values.
- Capture the complete first-defeat reward presentation.
Verified rematchPatch 1.07.00
Spoiler-hidden boss dossier
At the end of Chapter 5's Black and White questline, reach Crow's Nest in the Abyss and defeat Draven, the Crowcaller.
- Region
- West Demeniss
- Replay
- rematch
- Evidence
- community
- Story role
- story
Confirmed facts
Evidence-backed operational brief
Community-verified operational recordPreparation
- Reach the Chapter 5 finale of the Black and White questline.
- Bring reliable healing and Spirit recovery, then create a safe save before Crow's Nest.
- Verify the named objective and current patch before entering the point of no return.
Encounter route
- Follow Black and White into Crow's Nest in the Abyss.
- Defeat Draven and confirm the three equipment drops plus Aerial Roll unlock.
- After the first defeat, use the Church of West Demeniss Memory Fragment for the documented rematch modes.
Safe recovery
- Reload the newest safe save before Crow's Nest if the phase or completion transition stalls.
- Confirm the equipment drops and Aerial Roll state before advancing the story.
- Preserve the newest working save and record the exact objective, patch and platform before escalating a repeatable fault.
Verified rewards
- Blackwing Leather Armor
- Blackwing Mask
- Tauria Curved Sword
- Aerial Roll
Official patch history
Still unresolved
- Exact hidden health, damage, resistance and Resonate scaling values remain unpublished.
Next controlled checks
- Capture a repeatable route from a named landmark to the first encounter.
- Record visible phase transitions and arena hazards without inferring hidden values.
- Capture the complete first-defeat reward presentation.
Verified rematchPatch 1.07.00
Spoiler-hidden boss dossier
Complete the Spire of the Sun, enter the Nest of Valor and defeat Goyen; the supported rewards are the Witch's Ring and Greymane Earring.
- Region
- Spire of the Sun
- Replay
- rematch
- Evidence
- community
- Story role
- story
Confirmed facts
Evidence-backed operational brief
Community-verified operational recordPreparation
- Complete the Spire of the Sun to reach the Nest of Valor sequence.
- Bring reliable healing, upgraded armour and a safe save before beginning the encounter.
- Verify the named objective and current patch before entering the point of no return.
Encounter route
- Enter the Nest of Valor after the Spire of the Sun.
- Defeat Goyen and confirm the Witch's Ring and Greymane Earring are awarded.
- After the first defeat, use the Spire of the Sun Memory Fragment for the documented rematch modes.
Safe recovery
- Return to the most recent pre-encounter save if the challenge sequence fails to advance.
- Confirm both listed rewards and the next Skybridge objective before leaving the area.
- Preserve the newest working save and record the exact objective, patch and platform before escalating a repeatable fault.
Verified rewards
- Witch's Ring
- Greymane Earring
Official patch history
Still unresolved
- Exact hidden health, damage, resistance and Resonate scaling values remain unpublished.
Next controlled checks
- Capture a repeatable route from a named landmark to the first encounter.
- Record visible phase transitions and arena hazards without inferring hidden values.
- Capture the complete first-defeat reward presentation.
Verified rematchPatch 1.07.00
Spoiler-hidden boss dossier
Complete The Bonepit in Tommaso Town and defeat Muskan; the supported first-defeat reward is Combat God's Plate Gloves.
- Region
- Bonepit
- Replay
- rematch
- Evidence
- community
- Story role
- story
Confirmed facts
Evidence-backed operational brief
Community-verified operational recordPreparation
- Progress until The Bonepit encounter is available in Tommaso Town.
- Bring a current-patch combat loadout and create a safe save before entering the arena.
- Verify the named objective and current patch before entering the point of no return.
Encounter route
- Begin The Bonepit in Tommaso Town and follow its arena sequence.
- Defeat Muskan and confirm Combat God's Plate Gloves are awarded.
- After the first defeat, use the Bonepit Memory Fragment for the documented rematch modes.
Safe recovery
- Confirm The Bonepit objective is active before restoring an older save.
- Reload the newest safe save if the encounter or reward presentation stalls; preserve current-patch evidence before escalating.
- Preserve the newest working save and record the exact objective, patch and platform before escalating a repeatable fault.
Verified rewards
- Combat God's Plate Gloves
Official patch history
Still unresolved
- Exact hidden health, damage, resistance and Resonate scaling values remain unpublished.
Next controlled checks
- Capture a repeatable route from a named landmark to the first encounter.
- Record visible phase transitions and arena hazards without inferring hidden values.
- Capture the complete first-defeat reward presentation.
Official rematch — location unresolvedPatch 1.00.00
Spoiler-hidden boss dossier
Complete the Stjar Clan quest Ancient Barrier, then follow Fallen God to Titan in the Windsong Peaks of north-eastern Pailune.
- Region
- Pailune
- Replay
- rematch
- Evidence
- community
- Story role
- story
Confirmed facts
Phase 25 resolved research
Use a three-stage model: two mobile lightning stages followed by a gigantic stagger stage. Build lightning resistance, attack the hands and arms to fill the yellow stagger bar, then use the exposed back orb finisher.
Evidence-backed operational brief
Community-verified operational recordPreparation
- Complete the Pailune faction progression needed to unlock the Stjar Clan.
- Finish Ancient Barrier, then accept Fallen God and create a safe save before the marked encounter.
- Equip lightning resistance and a large shield, and remain inside the combat boundary corrected in Patch 1.06.
Encounter route
- Complete Ancient Barrier for the Stjar Clan.
- Clear the first two mobile lightning stages, then attack the gigantic form's hands and arms to fill the yellow stagger bar.
- Use the exposed back orb finisher and defeat Titan.
- Confirm the quest closes and the first-defeat rewards are awarded.
Safe recovery
- Confirm the named quest or faction objective is active before restoring an older save.
- Return to the title screen and reload the current safe save if the encounter marker or completion state stalls.
- Preserve the newest working save and record the exact current-patch failure state before escalating.
Verified rewards
- Lightning Bolt Plate Armor
- Reckoning
- Abyss Artifact
- Trace of Thunder God
Official patch history
- 1.06.00
Fixed a rematch start state that could leave the player struck immediately and a boundary case that could stop Titan moving.
Notice ↗
Still unresolved
- Exact Memory Fragment location and activation presentation.
- Exact health and damage values.
Next controlled checks
- Locate Titan's Memory Fragment through the Journal and confirm the world position.
- Capture first-defeat and rematch start states separately.
- Test arena-boundary behaviour only on the current patch.
Official mechanic evidencePatch 1.00.00
Spoiler-hidden boss dossier
During Chapter 12's A Shadow in the Void, reach Dimensional Bonds in the Abyss, enter Awakened Caliburn's chamber and defeat the Awakened Caliburn clone encounter.
- Region
- The Abyss
- Replay
- unknown
- Evidence
- community
- Story role
- story
Confirmed facts
Patch 1.06 fixed an Abyss Gate sometimes remaining after entering Awakened Caliburn's chamber.
Source ↗Evidence-backed operational brief
Community-verified operational recordPreparation
- Reach Chapter 12 and begin A Shadow in the Void after Caliburn escapes through the Abyss Gate.
- Complete an Abyss route into the central Dimensional Bonds island and create a safe save before entering the chamber.
- Keep Awakened Caliburn separate from Corrupted Caliburn; evidence from the other identity is not transferred.
Encounter route
- Follow A Shadow in the Void into the Abyss and reach Dimensional Bonds.
- Enter Awakened Caliburn's chamber and defeat the Awakened Caliburn clone encounter.
- Confirm the quest advances and Twisted Verdict is awarded.
Safe recovery
- Confirm A Shadow in the Void is active and Dimensional Bonds is reachable before restoring an older save.
- Reload the newest safe save if the chamber gate persists or the encounter state stalls; Patch 1.06 corrected an Abyss Gate persistence fault here.
- Preserve the newest working save and record the exact current-patch failure state before escalating.
Verified rewards
- Twisted Verdict
Official patch history
- 1.06.00
Corrected an Abyss Gate persistence issue inside the boss chamber.
Notice ↗
Still unresolved
- Rematch availability and any Memory Fragment location.
- Exact phase order, weaknesses, health and damage values.
- Any wider relationship to other Caliburn identities beyond the shared name.
Next controlled checks
- Capture current-patch phase and timing evidence without transferring facts from Corrupted Caliburn.
- Verify whether any post-story Memory Fragment or rematch route exists.
- Keep Awakened and Corrupted Caliburn records separate unless an official source links them.
Official mechanic evidencePatch 1.00.00
Spoiler-hidden boss dossier
Follow the Delesyia Society of Progress mission Forbidden Gatekeeper to Marni's Laboratorium, then destroy Dreadnought.
- Region
- Delesyia
- Replay
- unknown
- Evidence
- community
- Story role
- story
Confirmed facts
Patch 1.06 fixed attacks from behind sometimes failing during the Dreadnought battle.
Source ↗Phase 25 resolved research
Treat the Patch 1.06 rear-hit note as a repaired directional defect, not a weakness. Current operational play centres on avoiding the three-hit sequence, orbital strike, beam and forward ram; no hidden rear multiplier is claimed.
Evidence-backed operational brief
Community-verified operational recordPreparation
- Progress the Delesyia Society of Progress until Forbidden Gatekeeper is available.
- Travel to Marni's Laboratorium and create a safe save before the encounter.
- Prepare for the three-hit sequence, orbital strike, beam and forward ram; Patch 1.06's rear-hit note documents a repaired defect, not a weakness.
Encounter route
- Accept Forbidden Gatekeeper from the Delesyia Society of Progress.
- Enter Marni's Laboratorium, evade the telegraphed artillery and beam patterns, and destroy Dreadnought without assuming a rear damage bonus.
- Confirm the mission closes and the listed rewards are awarded.
Safe recovery
- Confirm the named quest or faction objective is active before restoring an older save.
- Return to the title screen and reload the current safe save if the encounter marker or completion state stalls.
- Preserve the newest working save and record the exact current-patch failure state before escalating.
Verified rewards
- Sonic Resonator
- Frozen Heart Plate Cloak
- Abyss Artifact
- 300 Delesyian Contribution
Official patch history
- 1.06.00
Corrected a battle issue affecting attacks made from behind Dreadnought.
Notice ↗
Still unresolved
- Rematch availability and any Memory Fragment location.
- Exact phase order, weaknesses, health and damage values.
Next controlled checks
- Retest rear-position attacks without converting a fixed defect into a claimed weakness.
- Capture a repeatable first-defeat route.
- Record completion, rewards and any Memory Fragment entry.
Official mechanic evidencePatch 1.00.00
Spoiler-hidden boss dossier
During Chapter 12, complete A Shadow in the Void, then follow Blinding Darkness through the Abyss encounter with Myurdin, the Avatar of Umbra.
- Region
- The Abyss
- Replay
- unknown
- Evidence
- community
- Story role
- story
Confirmed facts
Patch 1.06 fixed an unintended attack-pattern state for Myurdin, the Avatar of Umbra.
Source ↗Evidence-backed operational brief
Community-verified operational recordPreparation
- Reach Chapter 12 and complete A Shadow in the Void.
- Begin Blinding Darkness and create a safe save before the marked Abyss encounter.
- Use current-patch behaviour only; prepare Nature's Snare for the red-laser pattern and expect two health bars.
Encounter route
- Complete A Shadow in the Void and begin Blinding Darkness.
- Clear the first health bar, then use Nature's Snare against the red lasers and delay the jump response until roughly two to three seconds after the lasers stop.
- Defeat Myurdin, the Avatar of Umbra on the second health bar.
- Confirm Blinding Darkness advances beyond the encounter.
Safe recovery
- Confirm the named quest or faction objective is active before restoring an older save.
- Return to the title screen and reload the current safe save if the encounter marker or completion state stalls.
- Preserve the newest working save and record the exact current-patch failure state before escalating.
Verified rewards
No complete reward package is claimed.
Official patch history
- 1.06.00
Corrected abnormal attack-pattern behaviour during the encounter.
Notice ↗
Still unresolved
- The conflicting first-defeat reward reports require direct current-patch reproduction.
- Rematch availability and any Memory Fragment location.
- Exact phase order, weaknesses, health and damage values.
Next controlled checks
- Record the current-patch attack sequence without relying on pre-1.06 footage.
- Capture the first-defeat route and objective context.
- Verify completion, rewards and replay behaviour.
Official mechanic evidencePatch 1.00.00
Spoiler-hidden boss dossier
Follow the House Celeste quest Queen's Nest to Arboria Castle in Hernand, then defeat Queen Spider and its spawned acid spiders.
- Region
- Hernand
- Replay
- unknown
- Evidence
- community
- Story role
- story
Confirmed facts
The battle can spawn acid spiders; Patch 1.06 fixed lock-on behaviour for those adds.
Source ↗Phase 25 resolved research
Progress the House Celeste, Roberts, Serkis and Alfonso faction chain until Queen of the Silkspun Citadel / Queen's Nest becomes available; no unsupported numeric reputation threshold is claimed.
Evidence-backed operational brief
Community-verified operational recordPreparation
- Progress the House Celeste, Roberts, Serkis and Alfonso faction chain until Queen of the Silkspun Citadel / Queen's Nest becomes available.
- Travel to Arboria Castle in Hernand and create a safe save before entering the encounter.
- Equip Nature's Retribution for poison projectiles and prepare to ignore non-essential acid-spider adds.
Encounter route
- Accept Queen's Nest from House Celeste.
- Follow the quest marker into Arboria Castle; use the bow while the boss is on the wall, then commit melee combos after it returns to the ground.
- Confirm the quest closes and the first-defeat rewards are awarded.
Safe recovery
- Confirm the named quest or faction objective is active before restoring an older save.
- Return to the title screen and reload the current safe save if the encounter marker or completion state stalls.
- Preserve the newest working save and record the exact current-patch failure state before escalating.
Verified rewards
- Stirrups of the Open Sky
- Queen's Fangs
- Abyss Artifact
Official patch history
- 1.06.00
Fixed an issue where lock-on did not work correctly against acid spiders spawned during the Queen Spider battle.
Notice ↗
Still unresolved
- Rematch availability and any Memory Fragment location.
- Exact health, damage and phase timings.
Next controlled checks
- Verify where the encounter begins and what unlocks it.
- Record when acid spiders appear and how the arena communicates the mechanic.
- Capture completion and reward screens.
Official mechanic evidencePatch 1.00.00
Spoiler-hidden boss dossier
Follow Aerial Border to Marni's Aeronautical Research Base in Delesyia, then defeat Storm Crusher.
- Region
- Delesyia
- Replay
- unknown
- Evidence
- community
- Story role
- story
Confirmed facts
Storm Crusher places explosives during battle; Patch 1.06 fixed placed bombs failing to damage the player.
Source ↗Phase 25 resolved research
Use Nature's Snare level 2 against incoming bombs and projectiles to build stagger, keep moving clear of planted explosives, then destroy the exposed core during the stagger window.
Evidence-backed operational brief
Community-verified operational recordPreparation
- Progress the Delesyian Aerial Force until Aerial Border is available.
- Travel to Marni's Aeronautical Research Base and create a safe save before the encounter.
- Unlock Nature's Snare level 2 and prepare to intercept bombs and projectiles while moving clear of placed explosives.
Encounter route
- Accept Aerial Border from the Delesyian Aerial Force.
- Use Nature's Snare against incoming ordnance to build stagger, then destroy the exposed core and defeat Storm Crusher.
- Confirm the mission closes and the listed rewards are awarded.
Safe recovery
- Confirm the named quest or faction objective is active before restoring an older save.
- Return to the title screen and reload the current safe save if the encounter marker or completion state stalls.
- Preserve the newest working save and record the exact current-patch failure state before escalating.
Verified rewards
- Delesyian Ornamental Shield
- Marni Musket
- Abyss Artifact
- 300 Delesyian Contribution
Official patch history
- 1.06.00
Corrected bomb damage for explosives placed during this encounter.
Notice ↗
Still unresolved
- Rematch availability and any Memory Fragment location.
- Exact phase order, weaknesses, health and damage values.
Next controlled checks
- Capture the explosive placement telegraph and detonation sequence.
- Record a repeatable route and start condition.
- Verify completion, rewards and replay behaviour.
Official mechanic evidencePatch 1.00.00
Spoiler-hidden boss dossier
Follow Locked Barrier to Valvegard Garrison in Delesyia, then defeat Thunder Crusher.
- Region
- Delesyia
- Replay
- unknown
- Evidence
- community
- Story role
- story
Confirmed facts
Thunder Crusher places explosives during battle; Patch 1.06 fixed placed bombs failing to damage the player.
Source ↗Phase 25 resolved research
Use Nature's Snare level 2 to intercept bombs and projectiles while building stagger, avoid the electric emitters, then punish the exposed core rather than trading through the explosive field.
Evidence-backed operational brief
Community-verified operational recordPreparation
- Progress the Delesyian Aerial Force until Locked Barrier is available.
- Travel to Valvegard Garrison and create a safe save before the encounter.
- Unlock Nature's Snare level 2 and prepare to intercept bombs and projectiles while avoiding electric emitters.
Encounter route
- Accept Locked Barrier from the Delesyian Aerial Force.
- Use Nature's Snare to build stagger, avoid the electric emitters, then punish the exposed core and defeat Thunder Crusher.
- Confirm the mission closes and the listed rewards are awarded.
Safe recovery
- Confirm the named quest or faction objective is active before restoring an older save.
- Return to the title screen and reload the current safe save if the encounter marker or completion state stalls.
- Preserve the newest working save and record the exact current-patch failure state before escalating.
Verified rewards
- Mechanical Clockwork Blaster
- Abyss Artifact
- 300 Delesyian Contribution
Official patch history
- 1.06.00
Corrected bomb damage for explosives placed during this encounter.
Notice ↗
Still unresolved
- Rematch availability and any Memory Fragment location.
- Exact phase order, weaknesses, health and damage values.
Next controlled checks
- Capture the explosive placement telegraph and detonation sequence.
- Record a repeatable route and start condition.
- Verify completion, rewards and replay behaviour.
Official identity onlyPatch 1.00.00
Spoiler-hidden boss dossier
During Chapter 7, complete Ludvig's Whereabouts, then follow Time to Face Justice and defeat One-Armed Ludvig.
- Region
- Hernand
- Replay
- unknown
- Evidence
- community
- Story role
- story
Official aliases: Injured Ludvig
Confirmed facts
Knowledge > Bosses renamed Injured Ludvig to One-Armed Ludvig.
Source ↗Phase 25 resolved research
One-Armed Ludvig is the current Knowledge name for the forced Oongka encounter in Time to Face Justice; Injured Ludvig remains only a historical search alias. Use Oongka's Quick Grab as the parry-and-burst response.
Evidence-backed operational brief
Community-verified operational recordPreparation
- Reach Chapter 7 and complete Ludvig's Whereabouts.
- Begin Time to Face Justice and create a safe save before inspecting the enclosure.
- Keep One-Armed Ludvig as the current canonical identity, retain Injured Ludvig only as a search alias, and prepare Oongka's Quick Grab.
Encounter route
- Complete Ludvig's Whereabouts and begin Time to Face Justice.
- Inspect the blood in the enclosure and follow the forced Oongka sequence.
- Use Oongka's Quick Grab as the parry-and-burst response, defeat One-Armed Ludvig and confirm the listed rewards.
Safe recovery
- Confirm the named quest or faction objective is active before restoring an older save.
- Return to the title screen and reload the current safe save if the encounter marker or completion state stalls.
- Preserve the newest working save and record the exact current-patch failure state before escalating.
Verified rewards
- Ignir
- Solas Plate Armor
- Solas Plate Boots
Official patch history
- 1.13.00
The official English boss name was standardised from Injured Ludvig to One-Armed Ludvig.
Notice ↗
Still unresolved
- Rematch availability and any Memory Fragment location.
- Additional drops, exact phase order, weaknesses, health and damage values.
Next controlled checks
- Use One-Armed Ludvig as the canonical current name while retaining the old alias for search.
- Capture the current Journal entry and encounter start state.
- Keep other Ludvig names separate unless official evidence links them.
Official identity onlyPatch 1.00.00
Spoiler-hidden boss dossier
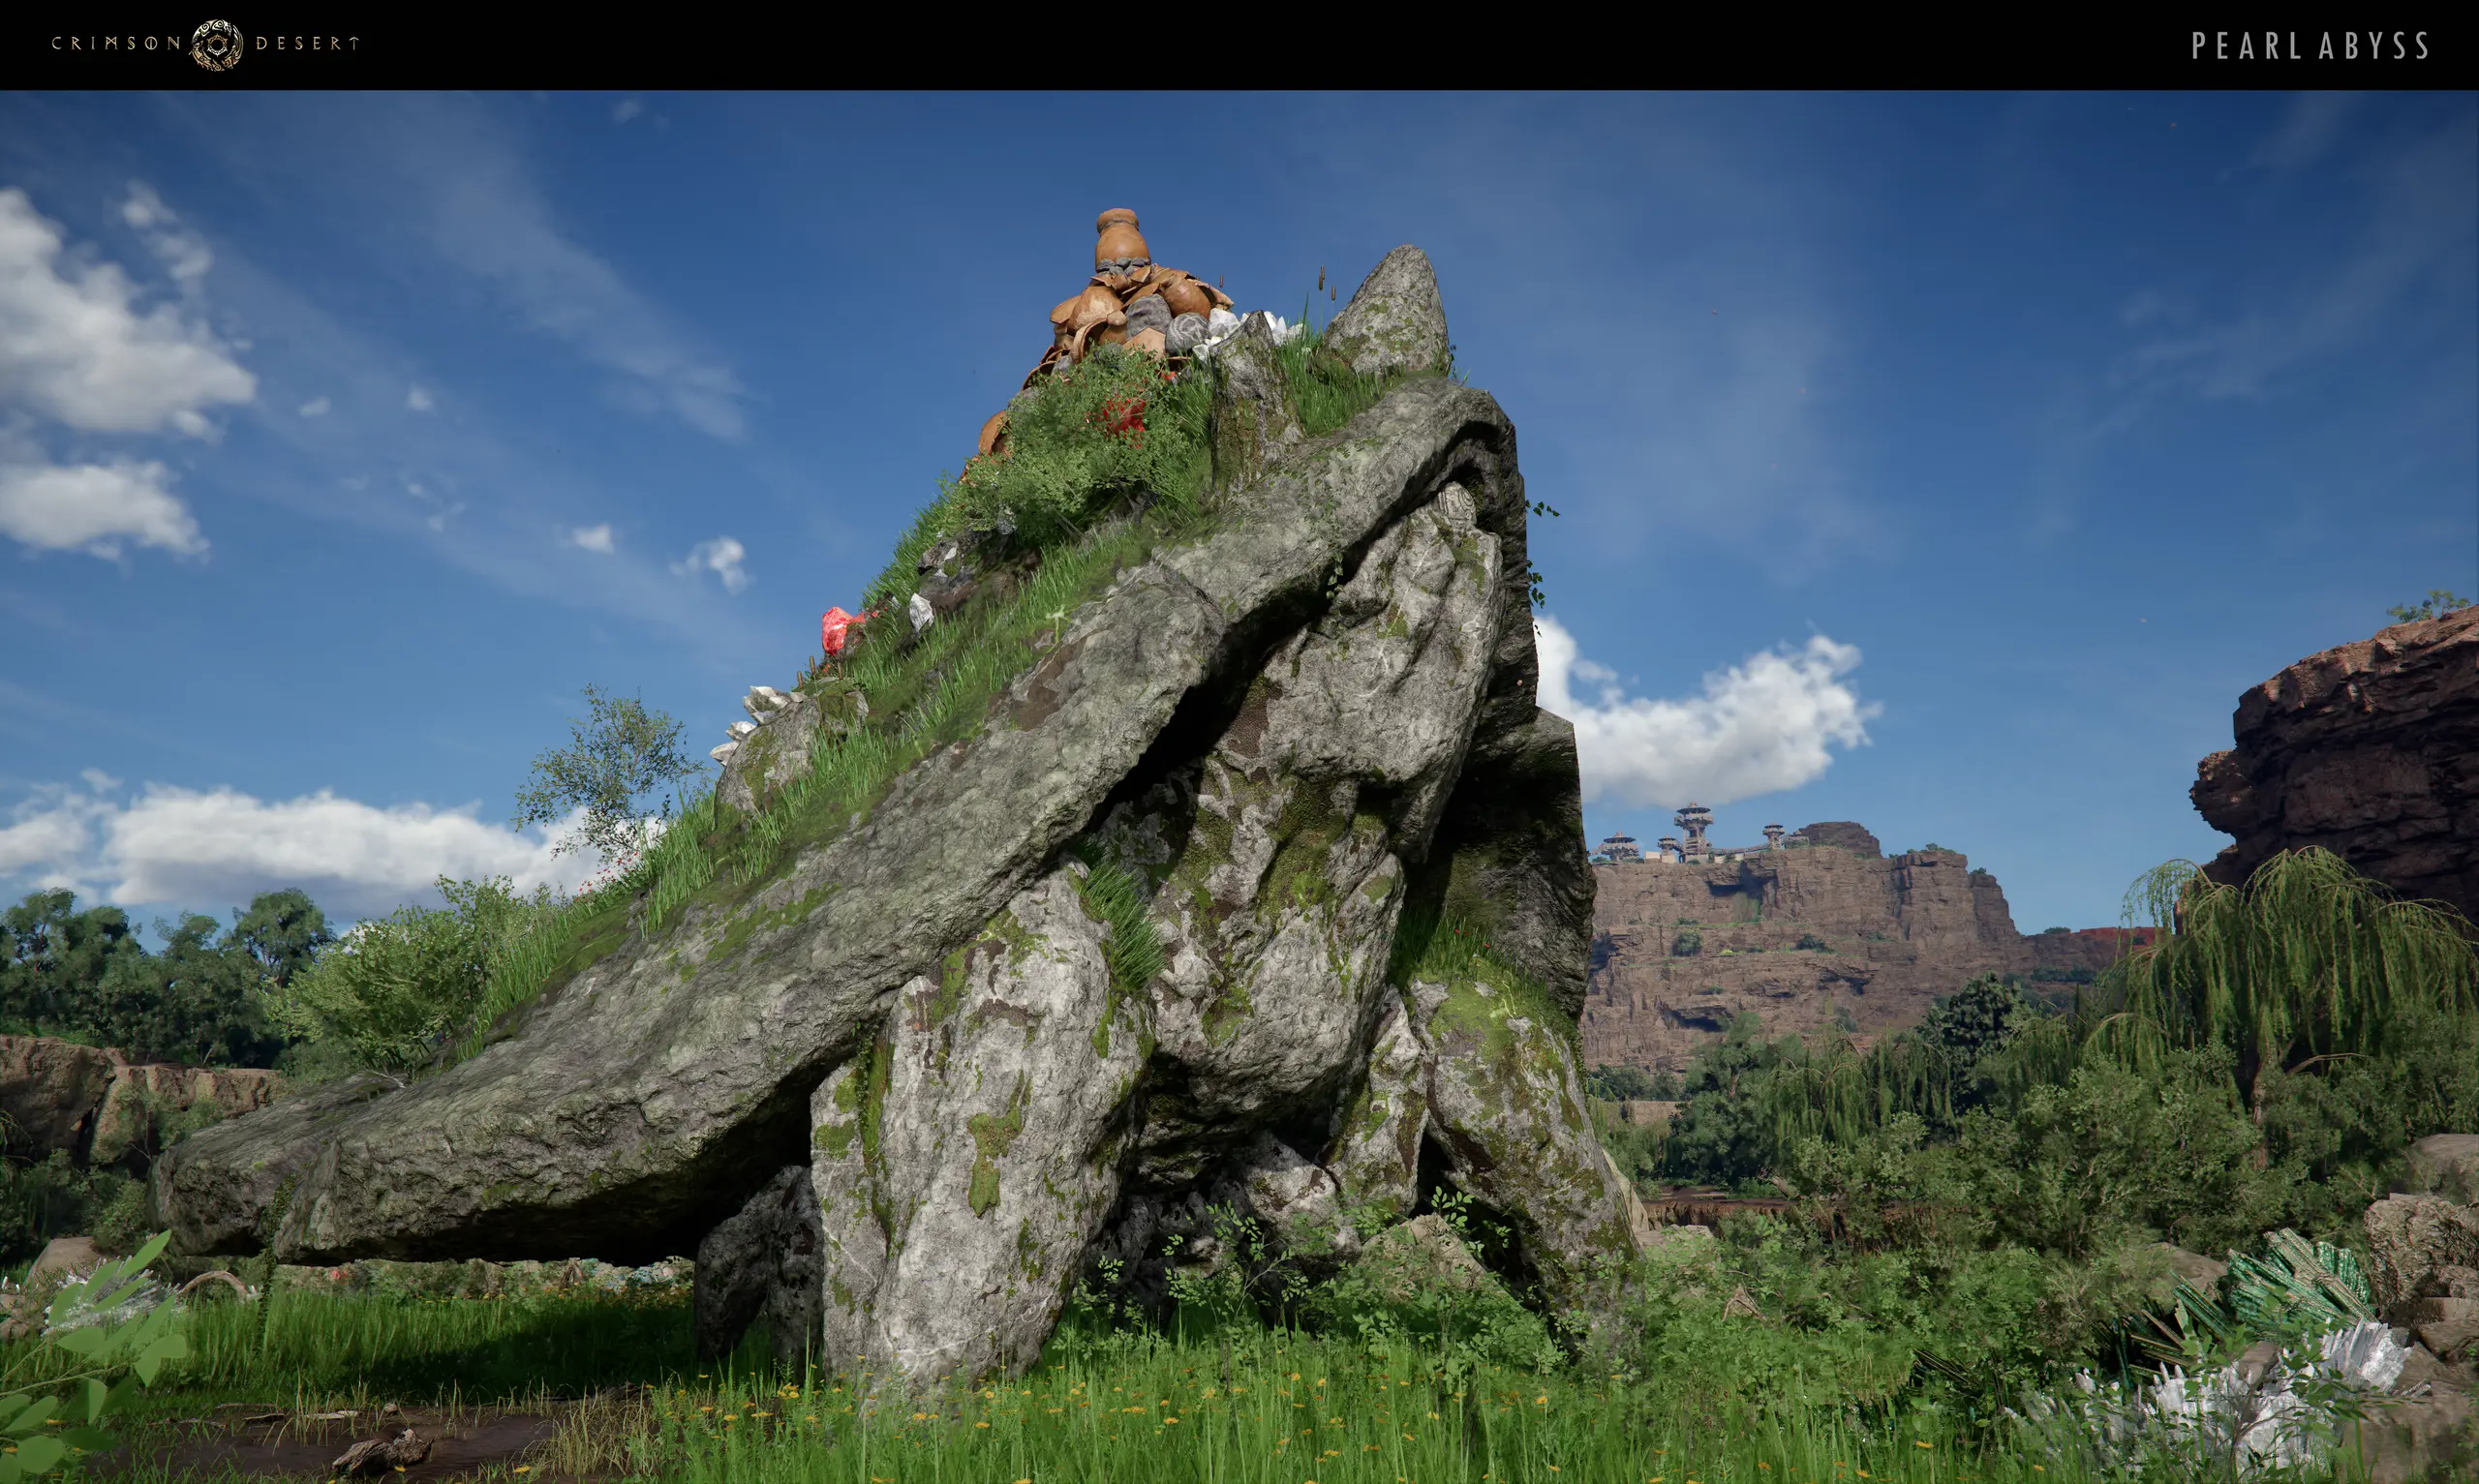
Complete The Wolf's Ballad at Redfox Trading Post, then follow The Queen's Lake to the Stoneback Crab Wetlands and defeat Queen Stoneback Crab.
- Region
- Delesyia
- Replay
- unknown
- Evidence
- community
- Story role
- story
Confirmed facts
Official promotional material describes Queen Stoneback Crab as a monster adorned with rare gems of Pywel.
Source ↗Phase 25 resolved research
The documented first defeat awards Diamond ×2, Garnet ×3 and Azurite ×5 alongside the quest's Abyss Artifact. Break the red back crystals, stab the exposed green cracks, then complete the jar interaction.
Evidence-backed operational brief
Community-verified operational recordPreparation
- Complete The Wolf's Ballad at Redfox Trading Post.
- Accept The Queen's Lake and create a safe save before travelling north to the Stoneback Crab Wetlands.
- Prepare heavy attacks for the red back crystals and keep the interaction path clear for the exposed green cracks.
Encounter route
- Complete The Wolf's Ballad and accept The Queen's Lake.
- Break the red back crystals, stab the exposed green cracks, then complete the jar interaction to defeat Queen Stoneback Crab.
- Confirm liberation, the Abyss Artifact and the Diamond ×2, Garnet ×3 and Azurite ×5 drops.
Safe recovery
- Confirm the named quest or faction objective is active before restoring an older save.
- Return to the title screen and reload the current safe save if the encounter marker or completion state stalls.
- Preserve the newest working save and record the exact current-patch failure state before escalating.
Verified rewards
- Abyss Artifact
- Diamond ×2
- Garnet ×3
- Azurite ×5
Official patch history
- gamescom-2024-demo
The identity appeared in official boss-battle promotional material recorded from a work-in-progress demo.
Notice ↗
Still unresolved
- Rematch availability and any Memory Fragment location.
- Exact hidden health, damage and resistance values.
Next controlled checks
- Verify the current-release encounter independently of the promotional demo.
- Capture route, completion and reward evidence.
- Do not transfer facts from similarly named bosses.
Official identity onlyPatch 1.00.00
Spoiler-hidden boss dossier
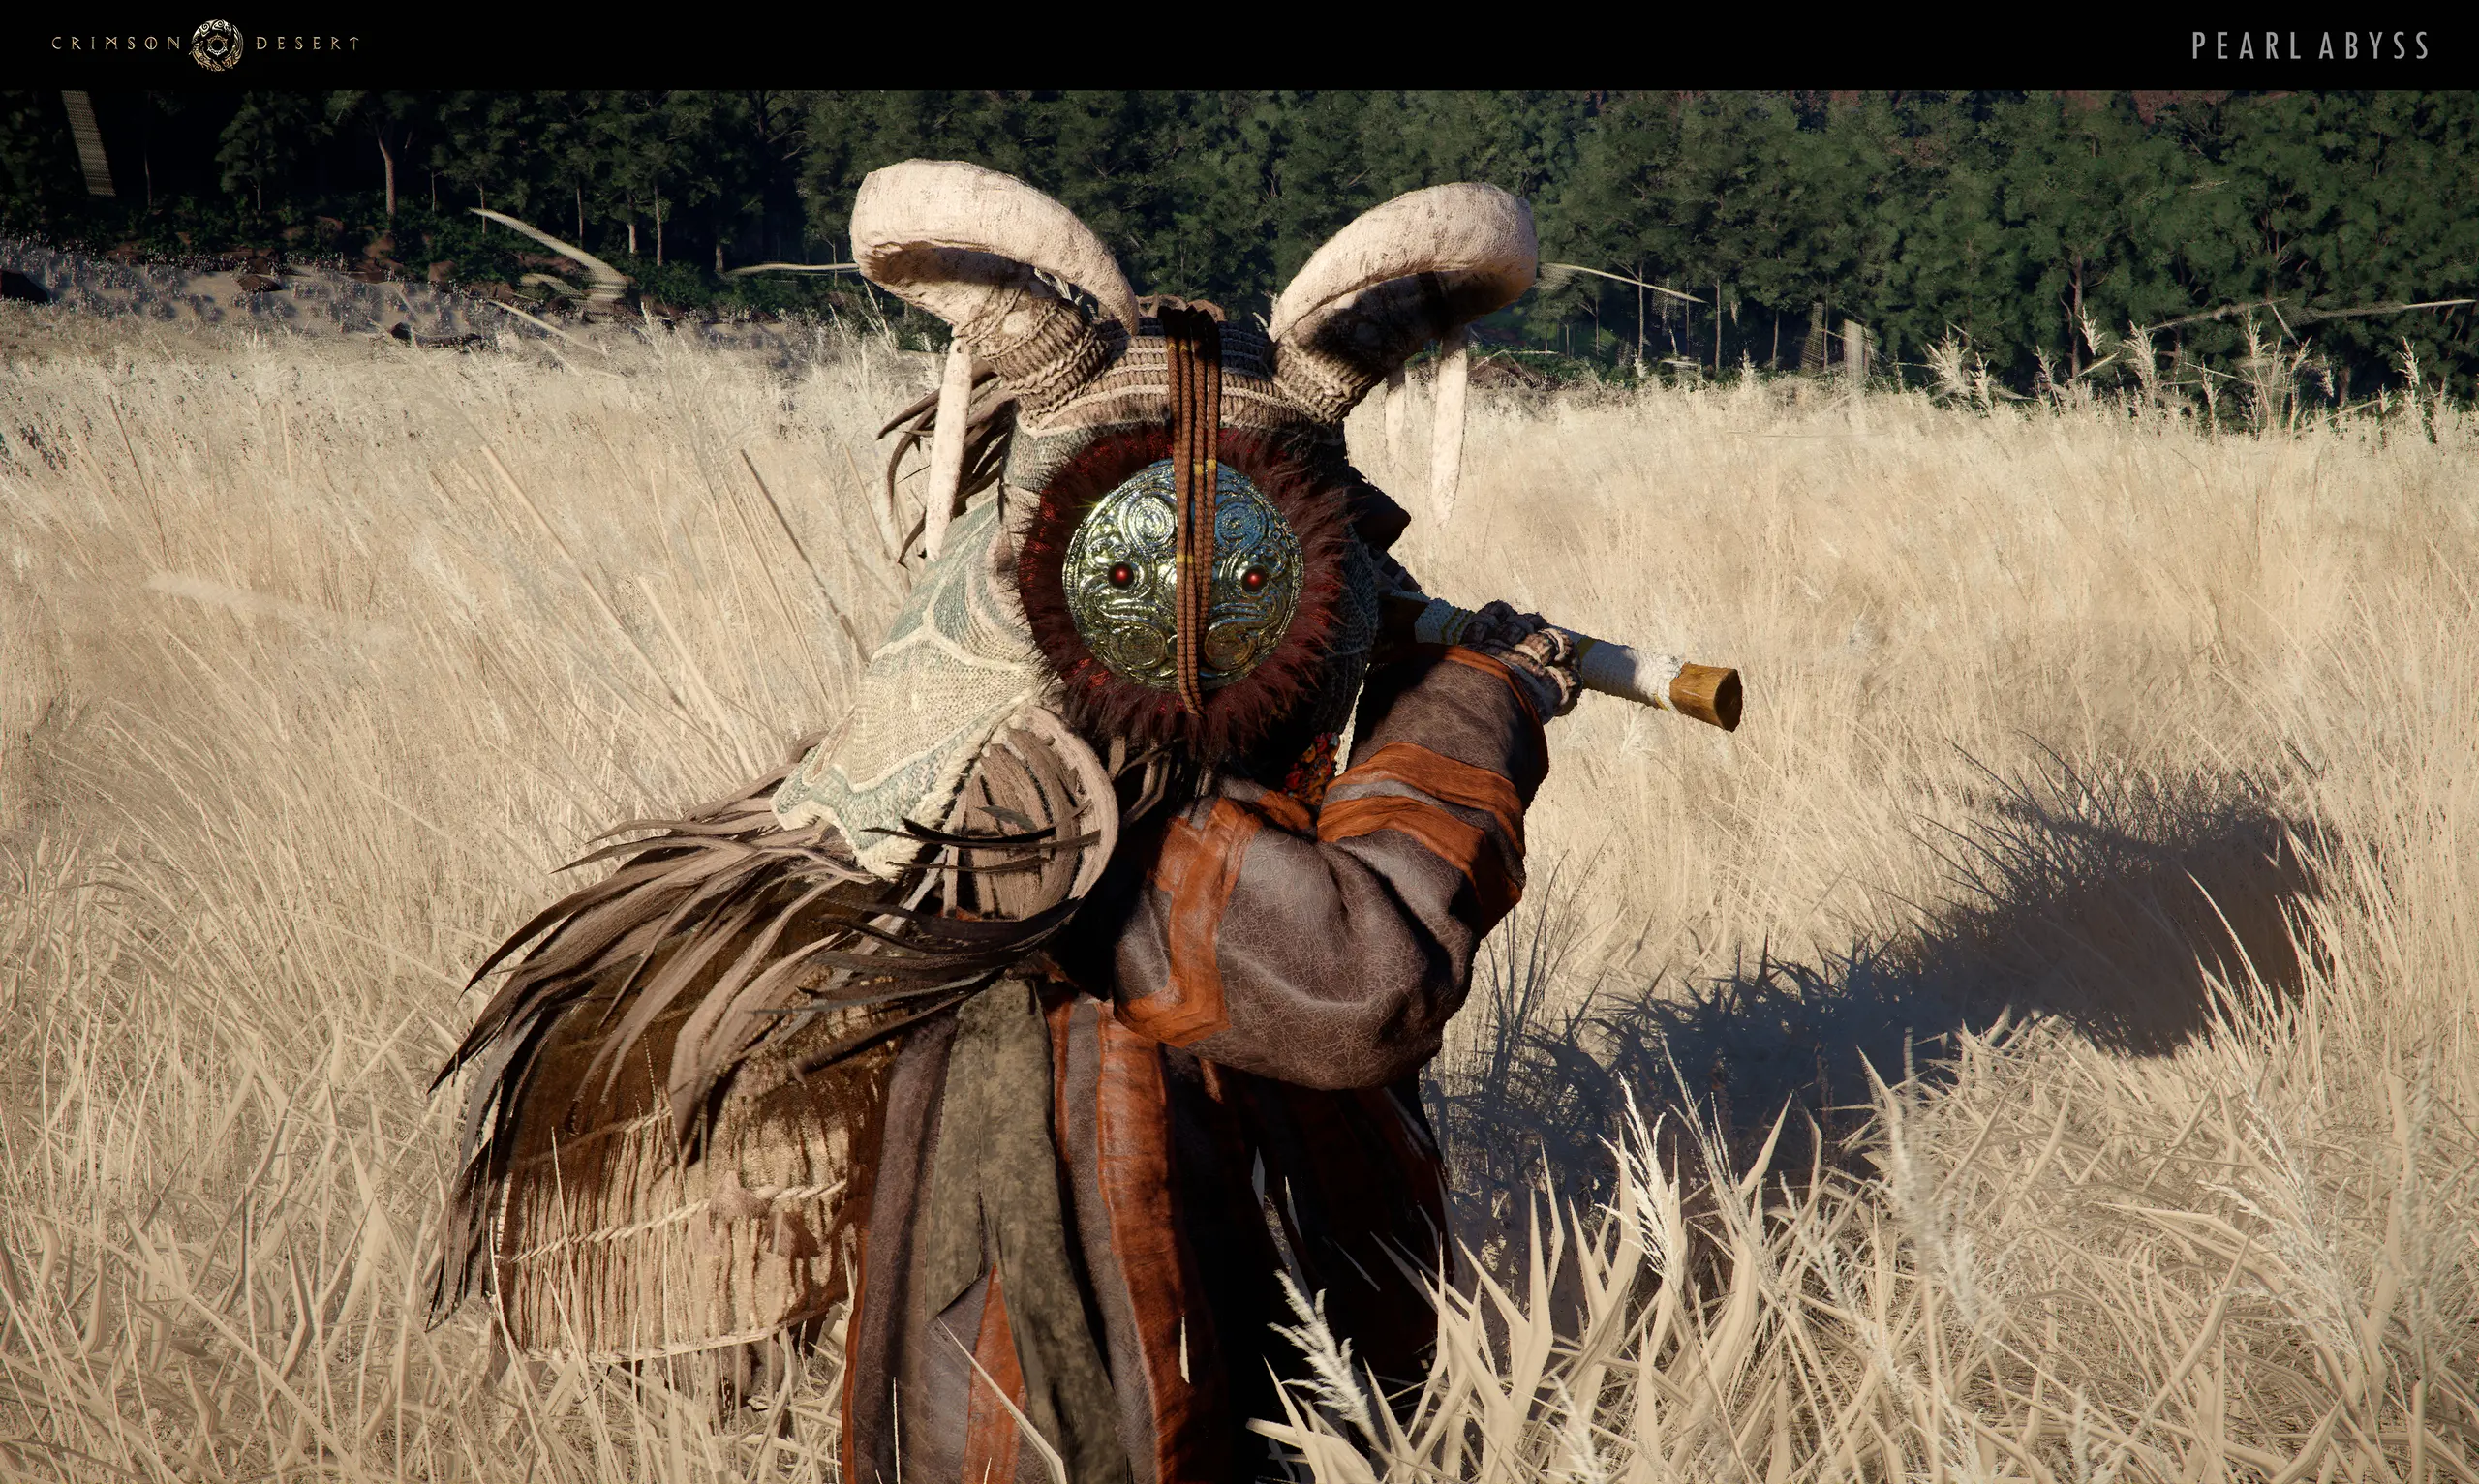
During Chapter 3, follow Dance with the Devil from the Mountain of Frozen Souls and defeat Reed Devil as the quest directs.
- Region
- Hernand
- Replay
- unknown
- Evidence
- community
- Story role
- story
Confirmed facts
Official promotional material describes Reed Devil as a slum-dweller of Hernand attempting to rewrite his fate.
Source ↗Phase 25 resolved research
The supported completion route is linear: opening melee stage, a second stage with five totems/clones, then a faster final stage with crescent projectiles. No optional branch is required for the documented clear.
Evidence-backed operational brief
Community-verified operational recordPreparation
- Reach the Chapter 3 sequence that opens Dance with the Devil.
- Start from the Mountain of Frozen Souls and create a safe save before the boss sequence.
- Carry the required Seed of Unease and follow the current quest markers.
Encounter route
- Begin Dance with the Devil from the Mountain of Frozen Souls.
- Clear the opening melee stage, then destroy the five totems/clones in the second stage.
- Survive the faster final stage and crescent projectiles, defeat Reed Devil, and confirm the quest awards Sunset Reed Cloth Gloves.
Safe recovery
- Confirm the named quest or faction objective is active before restoring an older save.
- Return to the title screen and reload the current safe save if the encounter marker or completion state stalls.
- Preserve the newest working save and record the exact current-patch failure state before escalating.
Verified rewards
- Sunset Reed Cloth Gloves
Official patch history
- gamescom-2024-demo
The identity appeared in official boss-battle promotional material recorded from a work-in-progress demo.
Notice ↗
Still unresolved
- Rematch availability and any Memory Fragment location.
- Additional drops, exact weaknesses, hidden health and damage values.
Next controlled checks
- Verify the current-release encounter independently of the promotional demo.
- Capture route, completion and reward evidence.
- Do not transfer facts from similarly named bosses.
Official identity onlyPatch 1.00.00
Spoiler-hidden boss dossier
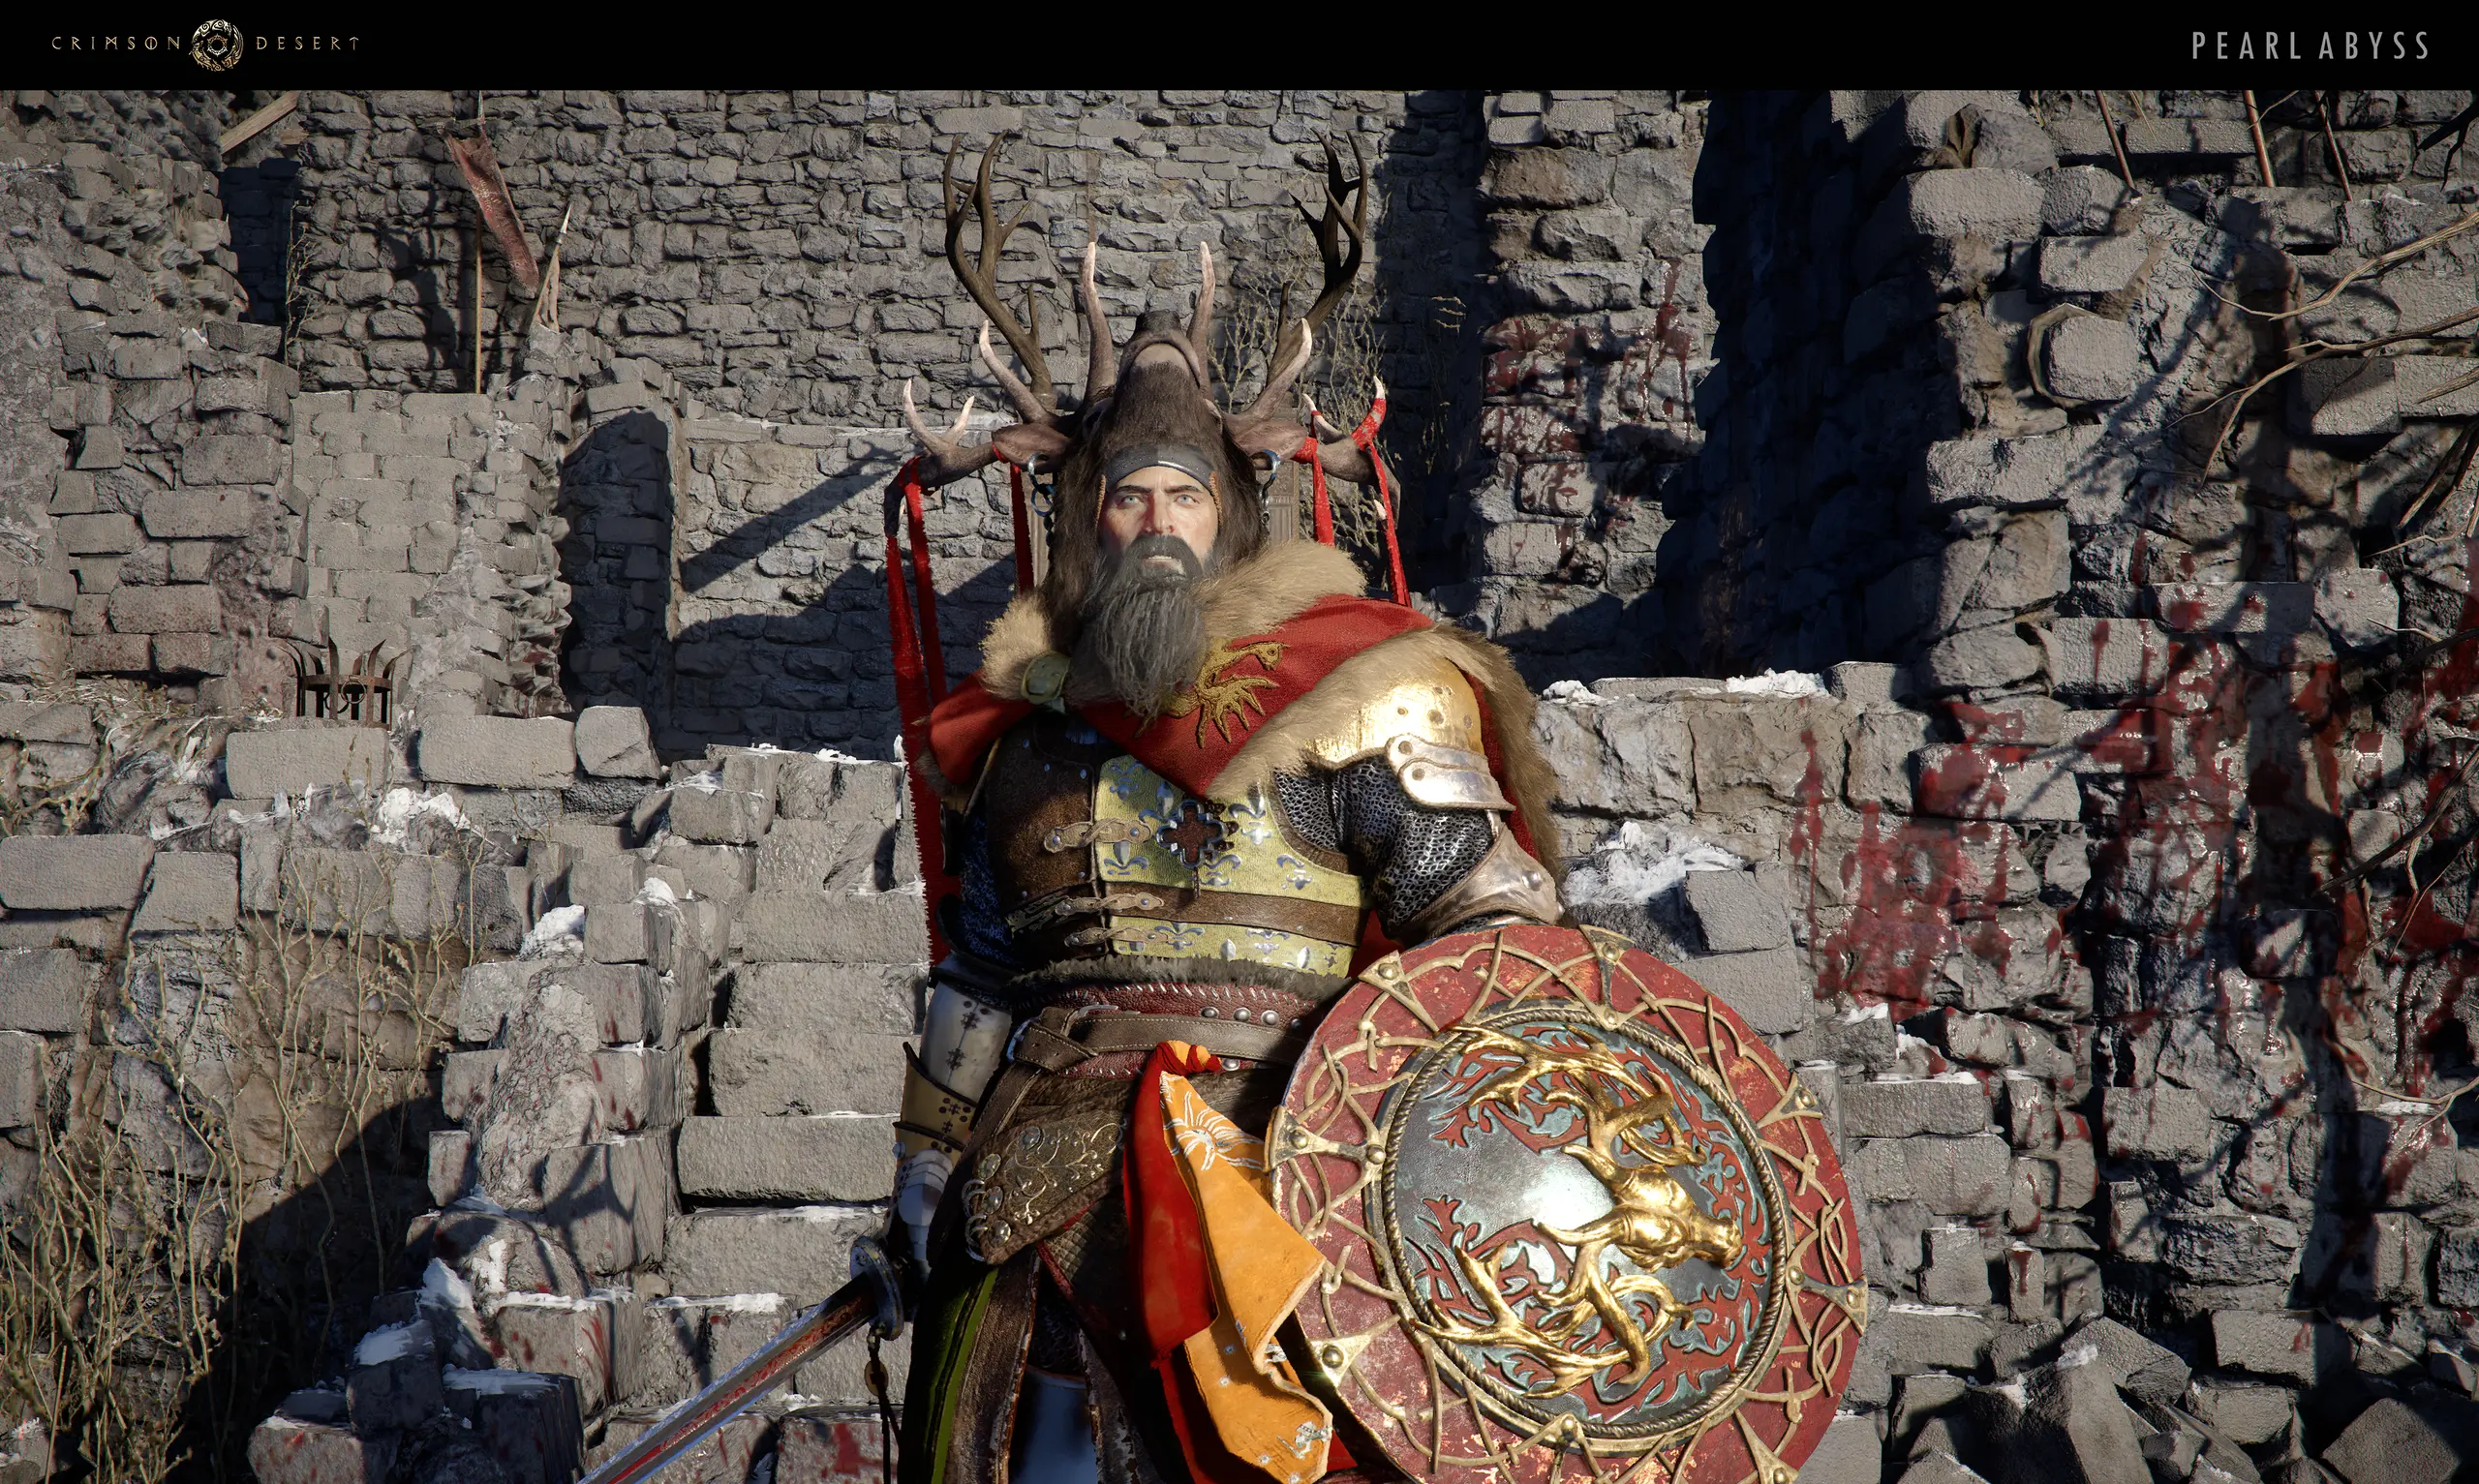
Follow the House Serkis quest Lord Amidst the Ruins to Icemoor Castle Ruins, then complete King of the Fallen Kingdom against Saigord Staglord.
- Region
- Hernand
- Replay
- unknown
- Evidence
- community
- Story role
- story
Confirmed facts
Official promotional material presents Staglord as a fallen king on a forsaken throne.
Source ↗Phase 25 resolved research
The current encounter is the House Serkis quest Lord Amidst the Ruins at Icemoor Castle Ruins; defeat Saigord during King of the Fallen Kingdom to receive Staglord's Shield and an Abyss Artifact.
Evidence-backed operational brief
Community-verified operational recordPreparation
- Progress the House Serkis questline until Lord Amidst the Ruins opens at Icemoor Castle Ruins.
- Create a safe save before entering the ruined-castle arena.
- Prepare for a shield-bearing boss without assuming unreproduced weaknesses or statistics.
Encounter route
- Follow Lord Amidst the Ruins into King of the Fallen Kingdom at Icemoor Castle Ruins.
- Defeat Saigord Staglord.
- Confirm the encounter closes and Staglord's Shield plus an Abyss Artifact are awarded.
Safe recovery
- Confirm the named quest or faction objective is active before restoring an older save.
- Return to the title screen and reload the current safe save if the encounter marker or completion state stalls.
- Preserve the newest working save and record the exact current-patch failure state before escalating.
Verified rewards
- Staglord's Shield
- Abyss Artifact
Official patch history
- gamescom-2024-demo
The identity appeared in official boss-battle promotional material recorded from a work-in-progress demo.
Notice ↗
Still unresolved
- Rematch availability and any Memory Fragment location.
- Additional drops, exact phase order, weaknesses, health and damage values.
Next controlled checks
- Verify the current-release encounter independently of the promotional demo.
- Capture route, completion and reward evidence.
- Do not transfer facts from similarly named bosses.
Official identity onlyPatch 1.00.00
Spoiler-hidden boss dossier
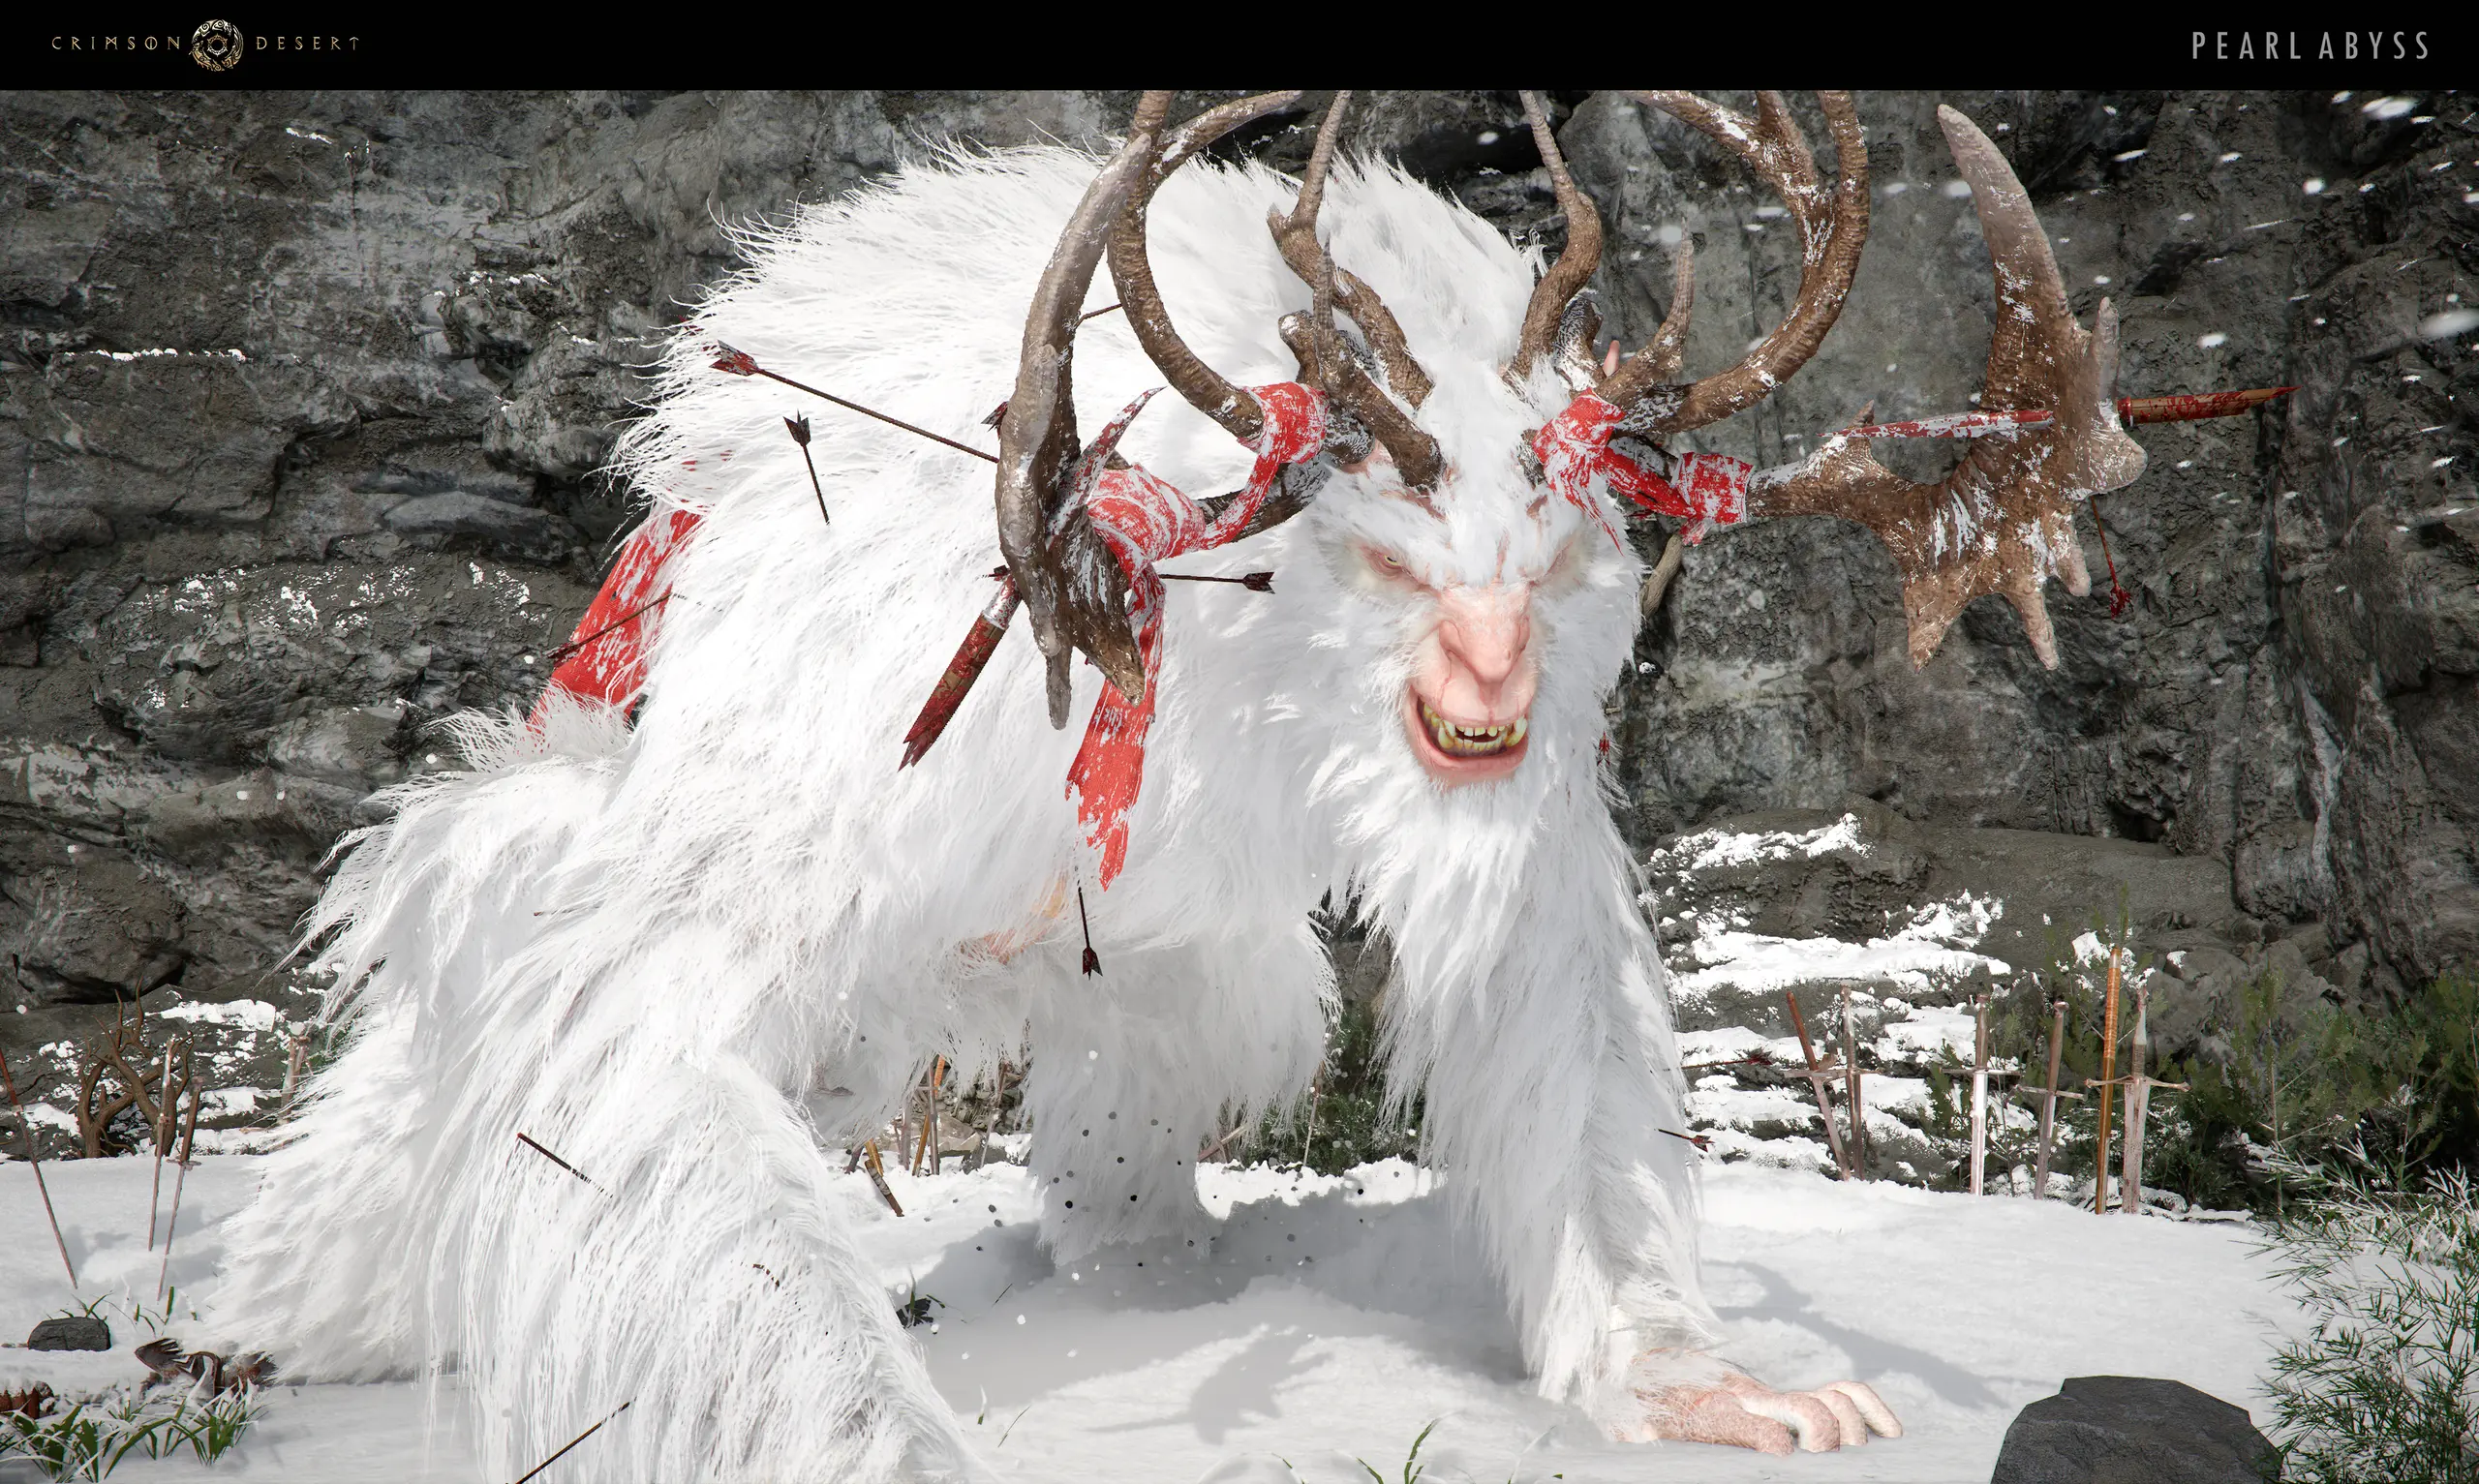
Complete Deep-Rooted Sorrow, then follow White Horn of Snowhaven Hearth to the encounter near Snowhaven Hearth in western Pailune.
- Region
- Pailune
- Replay
- unknown
- Evidence
- community
- Story role
- story
Confirmed facts
Official promotional material describes White Horn as a mountain spirit.
Source ↗Phase 25 resolved research
Current-release guides independently support fire as the practical damage plan: equip flame-capable attacks or explosive arrows and treat the old demo only as identity evidence.
Evidence-backed operational brief
Community-verified operational recordPreparation
- Complete the Pailune faction progression required for Deep-Rooted Sorrow.
- Accept White Horn of Snowhaven Hearth and create a safe save before following the marker west of Snowhaven Hearth.
- Equip fire-capable attacks or explosive arrows while treating exact hidden modifiers as unverified.
Encounter route
- Complete Deep-Rooted Sorrow and accept White Horn of Snowhaven Hearth.
- Follow the marker near Snowhaven Hearth and use flame pressure or explosive arrows to defeat White Horn.
- Confirm the quest closes and the listed rewards are awarded.
Safe recovery
- Confirm the named quest or faction objective is active before restoring an older save.
- Return to the title screen and reload the current safe save if the encounter marker or completion state stalls.
- Preserve the newest working save and record the exact current-patch failure state before escalating.
Verified rewards
- White Horn's Earring
- Frost Hail
- Abyss Artifact
Official patch history
- gamescom-2024-demo
The identity appeared in official boss-battle promotional material recorded from a work-in-progress demo.
Notice ↗
Still unresolved
- Rematch availability and any Memory Fragment location.
- Exact phase order, hidden health and damage values.
Next controlled checks
- Verify the current-release encounter independently of the promotional demo.
- Capture route, completion and reward evidence.
- Do not transfer facts from similarly named bosses.
No boss dossiers match the current filters.
The Boss Intelligence Centre consolidates all 17 canonical boss records into one evidence-controlled operational view. Phase 25 reverifies every dossier on Patch 1.16.03, promotes 12 source-paired operational answers, and preserves 31 unsupported questions instead of manufacturing hidden values or rematches.
Phase 25 closure
Section titled “Phase 25 closure”All 17 dossiers were reverified against their canonical route records and current-patch evidence. The Phase 19.5 baseline contained 43 controlled questions; Phase 25 resolves 12 and leaves 31 visible. Closures include Corrupted Caliburn’s three-stage terminology, Clockwork White Horn’s full reward package, Queen Spider’s unlock chain, Titan’s three-stage plan, safe Crusher responses, current-release White Horn tactics, the Staglord route, Reed Devil’s linear three-stage sequence, Queen Stoneback Crab drops and One-Armed Ludvig’s canonical encounter state.
The 31 remaining questions are deliberate. They cover unpublished hidden statistics, unproved rematches and Memory Fragment locations, disputed rewards, unsupported identity relationships and encounter details that still lack two compatible sources.
How to interpret a dossier
Section titled “How to interpret a dossier”- Verified rematch means the official Memory Fragment location and first-defeat activation rule are documented.
- Official rematch — location unresolved means an official notice confirms the rematch exists, but the guide has not recorded the Memory Fragment location.
- Official mechanic evidence means patch history confirms specific encounter behaviour; the separate operational brief carries its community-verified route and completion evidence.
- Official identity only describes the direct publisher evidence grade, while the separate operational brief records the supported current-release route without pretending it is an official source.
- Official Fan Kit portrait means the image comes from a named publisher asset, maps unambiguously to the exact canonical boss record and is covered by the publisher’s fan-content permission.
- Media pending means no exact official portrait or written creator licence is recorded. Attribution alone is not permission, so no community thumbnail or gameplay frame is delivered.
Media boundary
Section titled “Media boundary”The official Fan Kit supplies clean, named screenshots for White Horn, Staglord, Reed Devil and Queen Stoneback Crab. The remaining 13 dossiers display media pending. Their previous community-derived portraits were removed because creator credit and a source link did not provide a copyright licence to copy and republish the image. Anonymous image-search downloads, unidentified creatures, fantasy lookalikes and unlicensed creator media remain prohibited.
Awakened Caliburn and Corrupted Caliburn remain separate canonical dossiers. Neither receives a portrait until an exact official asset or written creator licence is recorded.
Variant rule
Section titled “Variant rule”Shared words do not prove that two boss names describe the same encounter. White Horn remains separate from Clockwork White Horn, and Awakened Caliburn remains separate from Corrupted Caliburn, unless an official source explicitly links them.
Research hand-off
Section titled “Research hand-off”The canonical Research Queue is empty after Phase 19.4. Use the Research Queue Centre protocol for private current-patch tests; a new canonical question should enter the published queue only when it is deliberately accepted as a controlled research record. A useful submission includes the patch, platform, save state, repeatable start point, ordered observations, completion evidence and a clear separation between direct observation and interpretation.